手機應用程式開發上被忽略的 SSL 處理
在網路上傳輸敏感資訊時,通常會使用 HTTPS 協定,讓客戶端與伺服器端對資料進行 SSL 加密處理,以降低資料在傳輸過程中被監聽或中間人攻擊的風險。HTTPS 的重要性逐漸被重視,Google 除了預設開啟 HTTPS 之外,未來更會將 HTTPS 的網站搜尋排名加分。但為了確保傳輸的安全,過程中客戶端會核對伺服器的憑證鏈 (certificate chain) 是否有效,若判定為無效時會作出警告。(詳見Wikipedia)
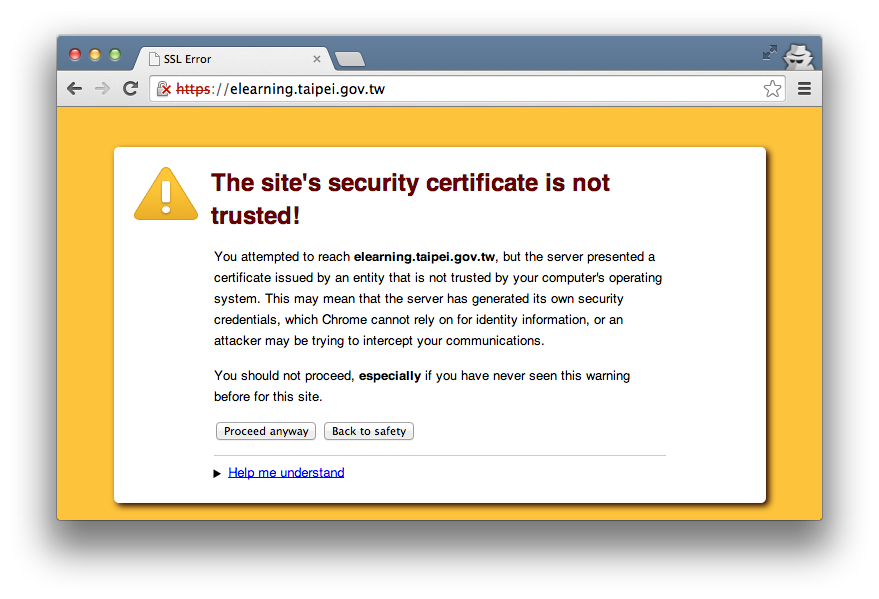 而在手機應用程式上 HTTPS 同樣重要,例如網路銀行、線上購物等。系統同樣會做憑證核對,但對被判定為無效的憑證就需要開發者作出額外的處理了。許多手機應用程式開發商在這個部分並沒有妥善處理好,以下我們就幾個常見的成因做基本的探討。
會被系統判定為無效的常見成因?
在探討該如何處理這個問題之前,這裡先列出一些有可能被系統判定成無效憑證的成因。
1. 系統支援問題 1
在 Android 2.2 及之前的版本,對 SSL 的支援上存在著一些問題,像是 SNI 和 Multiple Chain。而 Android 上不接受缺少中繼 CA 憑證的憑證鏈,例如:https://egov.uscis.gov/
2. 相關憑證未被預載到系統中
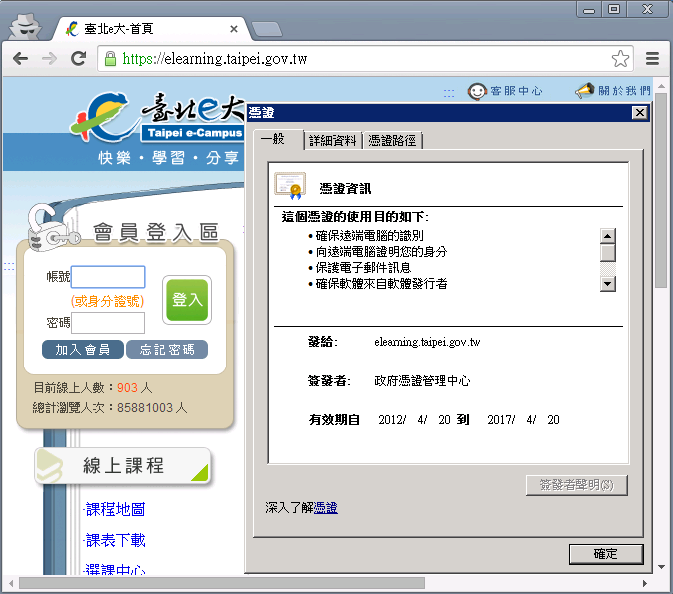
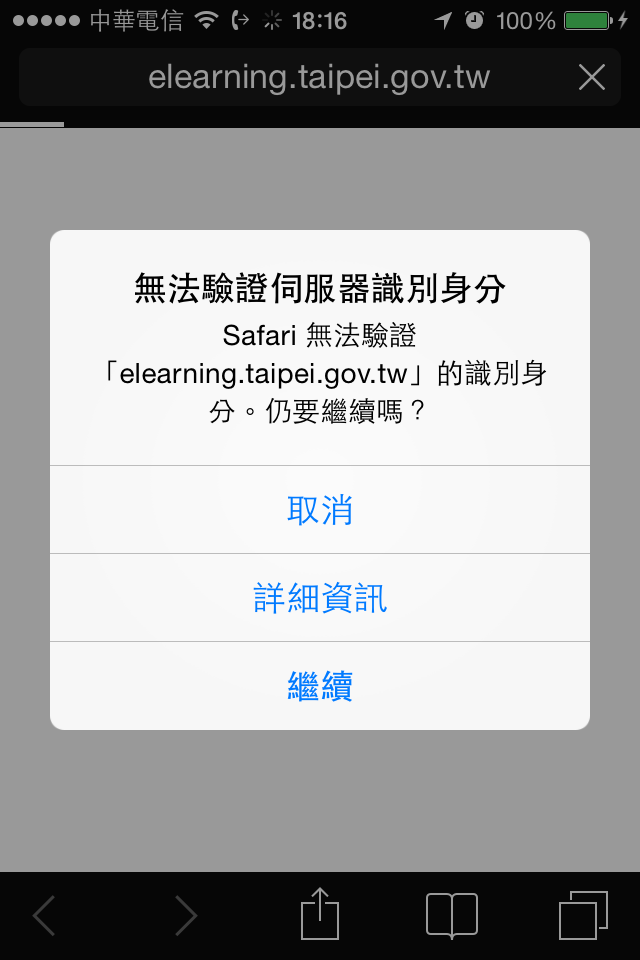
以 GCA 簽發的 SSL 憑證為例,在 Windows 上被判定為有效,但在 iOS 系統上卻因為 CA 不在系統的預載清單中而被判定為無效。
3. 使用自行簽發的憑證
這種情況常出現在應用程式開發階段的內部測試環境中,由於是內部測試環境一般都不會花錢去申請憑證。
4. 連線被中間人(MITM)攻擊
當連線被 MITM 攻擊時,使用者原本的連線目的地會被導到攻擊者的設備上,此時伺服器憑證也會被取代成攻擊者自行簽發的憑證,造成原本正常的連線出現異常。
開發者該如何處理?
理想情況下,客戶端的支援度充足,伺服器憑證鏈的來源及設定正確,只需使用系統原有的方式去檢查憑證即可達到安全效果。但若非得要相容低版本系統或是自行簽發憑證的時候,就得自行做額外的檢查。
在處理方式上,普遍是使用憑證綁定 (certificate pinning) 的方式,把需要比對的憑證預先存放在應用程式裡,待要進行 SSL Handshake 的時候再與伺服器的憑證做比對。
可是在實務上,大多開發人員採用消極的方法,把錯誤警告略過讓連線繼續進行,使得本來使用 SSL 加密連線帶來的安全性形同虛設。據 2012 年 Why Eve and Mallory Love Android: An Analysis of SSL (In)Security on Android 這篇論文指出,在 Google Play 上 13500 個免費熱門應用程式當中,共有 1074 個 (8%) 應用程式因錯誤的 SSL 處理而導致使用者陷入 MITM 攻擊的風險中。
下面我們整理了一些在手機應用開發上,常見的 SSL 處理錯誤,以及其對應適當的處理方法。
Android 錯誤處理情況1
1
2
3
4
@Override
public void onReceivedSslError(WebView view, SslErrorHandler handler, SslError error) {
    handler.proceed();
}
當透過 WebView 元件訪問 HTTPS 網站發生 SSL 錯誤時,會觸發 onReceivedSslError 這個函數。根據官方文件指出,可藉由執行 handler.proceed() 或是 handler.cancel() 來決定是否讓連線繼續進行。在不覆寫這函數的情況下預設會執行 handler.cancel()。而上面的做法卻讓異常的連線繼續進行了。
較為恰當的做法是使用 handler.cancel() 讓連線終止,或是限制在開發階段才執行 handler.proceed()。像 Apache Coradova 和 Facebook Android SDK 皆有對這部分做控管。
Android 錯誤處理情況2
1
2
3
4
5
6
7
8
9
10
11
12
13
14
15
16
17
TrustManager[] trustAllManager = new TrustManager[] { new X509TrustManager() {
    @Override
    public void checkClientTrusted(X509Certificate[] chain, String authType) {
    }

    @Override
    public void checkServerTrusted(X509Certificate[] chain, String authType) {
    }

    @Override
    public X509Certificate[] getAcceptedIssuers() {
        return null;
    }
} };

SSLContext sslContext = SSLContext.getInstance("TLS");
sslContext.init(null, trustAllManager, null);
本用來檢查伺服器憑證的 checkServerTrusted 被留空,導致警告被略過。Google 建議不要自行實作 TrustManager,而是把憑證放到 KeyStore,再把 KeyStore 放到 TrustManagerFactory,最後從 TrustManagerFactory 產出相關的 TrustManager,開發文件中有提供處理的範例。OWASP 的 WIKI 上也有提供自行實作 TrustManager 做 certificate pinning 的範例。2
下面節錄 Android 官方文件上的範例:
1
2
3
4
5
6
7
8
9
10
11
12
KeyStore keyStore = ...;
String algorithm = TrustManagerFactory.getDefaultAlgorithm();
TrustManagerFactory tmf = TrustManagerFactory.getInstance(algorithm);
tmf.init(keyStore);

SSLContext context = SSLContext.getInstance("TLS");
context.init(null, tmf.getTrustManagers(), null);

URL url = new URL("https://www.example.com/");
HttpsURLConnection urlConnection = (HttpsURLConnection) url.openConnection();
urlConnection.setSSLSocketFactory(context.getSocketFactory());
InputStream in = urlConnection.getInputStream();
Android 錯誤處理情況3
1
2
3
URL url = new URL("https://www.example.com/");
HttpsURLConnection conn = (HttpsURLConnection) url.openConnection();
conn.setHostnameVerifier(SSLSocketFactory.ALLOW_ALL_HOSTNAME_VERIFIER);
或是
1
2
3
4
5
6
HostnameVerifier allHostVerifier = new HostnameVerifier() {
    @Override
    public boolean verify(String hostname, SSLSession session) {
        return true;
    }
};
上述寫法略過了憑證中的 hostname 檢查,導致即使連線端與憑證中指定的 hostname 不一致也能通過。較為恰當的做法是不特別設定,讓他使用預設的 DefaultHostnameVerifier,或是採用更為嚴謹的 StrictHostnameVerifier。
iOS 錯誤處理情況1
1
2
3
4
5
6
@implementation NSURLRequest (IgnoreSSL)
+ (BOOL)allowsAnyHTTPSCertificateForHost:(NSString*)host
{
    return YES;
}
@end
此情況使用到 Framework 中的 Private API,雖然這種寫法會因為不能通過 Apple 的審查而不會出現在 AppStore 上(使用回避技巧不在這討論範圍內),但仍有機會在無需經過 Apple 審查的 Enterprise App 中使用。較為適當的做法是用 “#if DEBUG”,”#endif” 包起來以確保該段程式在編譯時只能對開發中的 debug 版上有作用。
iOS 錯誤處理情況2
1
2
3
4
5
6
7
8
9
10
- (BOOL)connection:(NSURLConnection *)connection canAuthenticateAgainstProtectionSpace:(NSURLProtectionSpace *)protectionSpace {
    return [protectionSpace.authenticationMethod isEqualToString:NSURLAuthenticationMethodServerTrust];
}

- (void)connection:(NSURLConnection *)connection didReceiveAuthenticationChallenge:(NSURLAuthenticationChallenge *)challenge {
    if ([challenge.protectionSpace.authenticationMethod isEqualToString:NSURLAuthenticationMethodServerTrust])
        [challenge.sender useCredential:[NSURLCredential credentialForTrust:challenge.protectionSpace.serverTrust] forAuthenticationChallenge:challenge];

    [challenge.sender continueWithoutCredentialForAuthenticationChallenge:challenge];
}
上面的做法會讓使用 NSURLConnection 的連線略過憑證檢查,容許任意憑證通過。下面節錄 OWASP WIKI 上的範例:
1
2
3
4
5
6
7
8
9
10
11
12
13
14
15
16
17
18
19
20
21
22
23
24
25
26
27
28
29
30
31
32
33
34
35
36
37
38
39
40
41
42
43
44
45
46
47
- (void)connection:(NSURLConnection *)connection didReceiveAuthenticationChallenge:
                   (NSURLAuthenticationChallenge *)challenge
{
    if ([[[challenge protectionSpace] authenticationMethod] isEqualToString: NSURLAuthenticationMethodServerTrust])
    {
        do
        {
            SecTrustRef serverTrust = [[challenge protectionSpace] serverTrust];
            if(nil == serverTrust)
                break; /* failed */

            OSStatus status = SecTrustEvaluate(serverTrust, NULL);
            if(!(errSecSuccess == status))
                break; /* failed */

            SecCertificateRef serverCertificate = SecTrustGetCertificateAtIndex(serverTrust, 0);
            if(nil == serverCertificate)
            break; /* failed */

            CFDataRef serverCertificateData = SecCertificateCopyData(serverCertificate);
            [(id)serverCertificateData autorelease];
            if(nil == serverCertificateData)
                break; /* failed */

            const UInt8* const data = CFDataGetBytePtr(serverCertificateData);
            const CFIndex size = CFDataGetLength(serverCertificateData);
            NSData* cert1 = [NSData dataWithBytes:data length:(NSUInteger)size];

            NSString *file = [[NSBundle mainBundle] pathForResource:@"random-org" ofType:@"der"];
            NSData* cert2 = [NSData dataWithContentsOfFile:file];

            if(nil == cert1 || nil == cert2)
                break; /* failed */

            const BOOL equal = [cert1 isEqualToData:cert2];
            if(!equal)
                break; /* failed */

            // The only good exit point
            return [[challenge sender] useCredential: [NSURLCredential credentialForTrust: serverTrust]
                        forAuthenticationChallenge: challenge];
        } while(0);
    }

    // Bad dog
    return [[challenge sender] cancelAuthenticationChallenge: challenge];
}
處理方式與前面的 Android 情況2類同,做了 certificate pinning。
iOS 錯誤處理情況3
1
2
3
4
5
6
7
8
9
10
11
12
13
- (void) URLSession:(NSURLSession *)session
didReceiveChallenge:(NSURLAuthenticationChallenge *)challenge
  completionHandler:(void (^)(NSURLSessionAuthChallengeDisposition disposition,
                              NSURLCredential *credential))completionHandler
{
    NSURLProtectionSpace * protectionSpace = challenge.protectionSpace;
    if ([protectionSpace.authenticationMethod isEqualToString:NSURLAuthenticationMethodServerTrust]) {
        SecTrustRef serverTrust = protectionSpace.serverTrust;
        completionHandler(NSURLSessionAuthChallengeUseCredential, [NSURLCredential credentialForTrust: serverTrust]);
    } else {
        completionHandler(NSURLSessionAuthChallengePerformDefaultHandling, nil);
    }
}
與前面 NSURLConnection 的情況類同,只是這裡使用到的是 iOS7 新增的 NSURLSession 元件。對應的處理方式如下:
1
2
3
4
5
6
7
8
9
10
11
12
13
14
15
16
17
18
19
20
21
22
23
24
25
26
27
28
29
30
31
32
33
- (void) URLSession:(NSURLSession *)session
didReceiveChallenge:(NSURLAuthenticationChallenge *)challenge
  completionHandler:(void (^)(NSURLSessionAuthChallengeDisposition disposition,
                              NSURLCredential *credential))completionHandler
{
    if ([[[challenge protectionSpace] authenticationMethod] isEqualToString:NSURLAuthenticationMethodServerTrust]) {
        SecTrustRef serverTrust = [[challenge protectionSpace] serverTrust];
        if (serverTrust != NULL) {
            OSStatus status = SecTrustEvaluate(serverTrust, NULL);
            if(!(errSecSuccess == status)) {
                completionHandler(NSURLSessionAuthChallengeCancelAuthenticationChallenge, nil);
                return;
            }

            NSData *localCertData = [NSData dataWithContentsOfFile:[[NSBundle mainBundle]
                                                   pathForResource:@"random-org"
                                                            ofType:@"der"]];

            SecCertificateRef remoteServerCert = SecTrustGetCertificateAtIndex(serverTrust, 0);
            CFDataRef remoteCertData = SecCertificateCopyData(remoteServerCert);
            BOOL isMatch = [localCertData isEqualToData: (__bridge NSData *)remoteCertData];
            CFRelease(remoteCertData);

            if (isMatch) {
                completionHandler(NSURLSessionAuthChallengeUseCredential, [NSURLCredential credentialForTrust:serverTrust]);
            } else {
                completionHandler(NSURLSessionAuthChallengeCancelAuthenticationChallenge, nil);
            }
        }
    } else {
        completionHandler(NSURLSessionAuthChallengePerformDefaultHandling, nil);
    }
}
對 WebView 的一些補充
在對 WebView 做處理上,除了對 SSL 錯誤直接略過外,目前無論是在 Android 還是 iOS 上,SDK API 都尚未直接提供方法讓開發者能在 SSL Handshake 的途中作 Server Certificate Pinning。其中一個替代方法是,利用其他能夠作 Pinning 的元件將資料下載回來,接著把資料傳到 WebView 進行讀取,避開原本用 WebView 直接設定連線網址。蘋果公司有提供這種處理的範例。
結語
本來為了提高安全性而使用的 SSL 加密連線,卻由於程式處理不當讓原來的保護形同虛設。觀念不足與為節省時間而沒做好處理相信是主要原因。網路上大量的文章在引指開發者略過錯誤警告的時候,卻沒有提醒他們這樣做帶來的影響,也助長了不當處理的發生。
除了 SSL 處理問題外,手機應用程式開發還有許多要注意的安全問題,像是 OWASP 列出的 Top 10 Mobile Risks、由日本智慧型手機安全協會發佈 Android Application Secure Design/Secure Coding Guidebook 裡面所建議的。開發商有責任做好安全把關以保障雙方權益。
參考
- Rethinking SSL Development in an Appified World
- Unifying Key Store Access in ICS | Android Developers Blog
- The CommonsBlog — SSL on Android: The Basics
- Security with HTTPS and SSL | Android Developers
- Networking Programming Topics: Overriding TLS Chain Validation Correctly
- Technical Note TN2232: HTTPS Server Trust Evaluation
- Certificate and Public Key Pinning - OWASP